Monday, February 16, 2015

The specified URL is not a top-level Web site

While doing site Backup and Restore in SharePoint 2013, i was getting the following error. Please note that the site collection is Host Name Site collection not Path based site collection.

The command i was giving is

PS C:\Windows\system32> Restore-SPSite http://sites.mytestsites.com/sites/mytestsite1 -Path "D:\Backup\MYTESTSITE1-PROD-20150210-2351.bak" -DatabaseName "SP13_Content_TESTSITEDB" -HostHeaderWebApplication "http://WFESERVERNAME" -Force 

The specified URL is not a top-level Web site. The backup and restore operations work only for top-level Web sites. Enter the URL for a site to try the

operation again.

At line:1 char:1
+ Restore-SPSite http://sites.mytestsites.com/sites/testSite1 -Path "D:\Backup\ ...
+ ~~~~~~~~~~~~~~~~~~~~~~~~~~~~~~~~~~~~~~~~~~~~~~~~~~~~~~~~~~~~~~~~~~~~~~~~~~~~~~~~
    + CategoryInfo          : InvalidData: (Microsoft.Share...dletRestoreSite:SPCmdletRestoreSite) [Restore-SPSite], SPException
    + FullyQualifiedErrorId : Microsoft.SharePoint.PowerShell.SPCmdletRestoreSite

The only thing that worked for me is 

- Deleting the existing site collection using the Remove-Spsite powershell cmdlet.
- Restoring the site from Backup using Restore-Spsite powershell cmdlet targeting to specific content DB

Remove-SPSite -Identity "http://sites.mytestsites.com/sites/TestSite1" -GradualDelete

Restore-SPSite http://sites.mytestsites.com/sites/MyTestSite1 -Path "D:\Backup\MyTestSite1.bak" -DatabaseName "SP13_Content_TestSitesContentDB" -HostHeaderWebApplication "http://WFESERVERNAME"

Hope this helps for some one who is having similar issue in backing up and restoring Host Name Site Collection (HNSC)

If someone finds a reason for this or is there any other way of doing this restore please let me know. 

Thanks,

Vinay. 

Friday, February 13, 2015

Export-SpWeb : The URL provided is invalid


While running the Export command for exporting the list from one site to another, i was giving the exact syntax but giving me the following error.

Export-SPWeb http://sites.sp13.com/sites/MyDevSite -Path "D:\SharePointBackUps\MyTestList.bak" -ItemUrl "http://sites.sp13.com/sites/MyDevSite/Lists/MyTestList" -IncludeUserSecurity -IncludeVersions All

Export-SPWeb : The URL provided is invalid. Only valid URLs that are site collections or sites are allowed to be exported using
stsadm.exe.
At line:1 char:1
+ Export-SPWeb -Identity http://sites.sp13.com/sites/myDevSite -Path "D: ...
+ ~~~~~~~~~~~~~~~~~~~~~~~~~~~~~~~~~~~~~~~~~~~~~~~~~~~~~~~~~~~~~~~~~~~~~~~~~~~~~~~~
    + CategoryInfo          : InvalidData: (Microsoft.Share...CmdletExportWeb:SPCmdletExportWeb) [Export-SPWeb], SPException
    + FullyQualifiedErrorId : Microsoft.SharePoint.PowerShell.SPCmdletExportWeb

Annoying, isn't it?

After reading the some of the blogs, the following link helped me
http://blogs.msdn.com/b/briangre/archive/2014/03/18/export-spweb-syntax-changes-between-root-site-and-sub-sites.aspx 

After giving the following syntax it worked. The issue occurring at -ItemUrl parameter. After giving in the format Lists/LISTNAME it worked.

Export-SPWeb http://sites.sp13.com/sites/MyDevSite -Path "D:\SharePointBackUps\MyTestList.bak" -ItemUrl "Lists/MyTestList" -IncludeUserSecurity -IncludeVersions All

Why??
The reason is at the background Get-SPWeb cmdlet is calling SPWeb.GetList(), before calling this function it prepends SPWeb.ServerRelativeUrl and an extra forward slash "/".

HTH

Vinay. 

Wednesday, December 3, 2014

Your changes were saved but could not be uploaded because of an error

This is the issue with the SharePoint 2010 office file not uploaded to SharePoint. What happens is when the user trying to download a copy from the SharePoint site and makes changes to it and uploads it back. Office 2010 suite and SharePoint, there is a medium called 'Microsoft Document upload Center' acts as medium between office files and SharePoint site.
http://office.microsoft.com/en-us/excel-help/microsoft-office-2010-upload-center-HA010388348.aspx

When opening the document from the server, the Microsoft Upload Center stores a local copy in its cache, and when the user makes the changes, the changes are first updated and local copy when saved, the changes from "Document Cache" which is in Microsoft Upload center gets updated back to the SharePoint site.

Sometimes due to network connectivity issues, the file may file to upload to SharePoint after user finished with changes. When we open the same file from the SharePoint you would get the following error

'Your Changes were save but could not be uploaded because of an error. You may be able to upload the file using the server Web page'


Most probable reason could be sitting in Microsoft Document Upload Center. To resolve this issue follow these steps

Step1: Access the Microsoft Document Upload Center from the 'Task Manager'

Step2: Look for any Cache errors.

Step3: Save the local copy if required.
Step4: Clear the Cache, this will remove the entire cache. or Discard the changes to file only that should remove the cache.

Step5: Try opening the file from SharePoint and save it back. That error pop up in the Document should go away.
 

Sunday, October 26, 2014

An error occurred while trying to load some required components

An error occurred while trying to load required components in Visual Studio 2012

This could be the case happening while installing Office Developer Tools in offline mode and then started creating SharePoint projects using Visual Studio 2012


An error occurred whilst trying to load some required components, Please ensure the following prerequisite components are installed.

Microsoft Web Developer Tools

Microsoft Exchange Web Services

The possible reason could be while installing the Office Developer tools and prerequisites, the office web installer sets some parameters mapped to GAC, which is not done while installed in offline mode according to following link
http://blogs.msdn.com/b/timquin/archive/2013/01/22/setting-up-visual-studio-2012-for-sharepoint-2013-development-offline.aspx

The fix this try the following steps:
- To un-install Microsoft Exchange Web Services from Control Panel
- Open the 'Command Prompt' with Administrator Previliges
- Navigate to location of file EWSManagedApi32.msi from the Command Prompts
- Run the following command. Make sure to be in single line. There is 'space' between .msi  and addlocal

  EwsManagedApi32.msi addlocal="ExchangeWebServicesApi_Feature,ExchangeWebServicesApi_Gac"

- The installation of the Exchange Web Services Api finishes. This commands does the installation and as well as maps the required dll files in GAC.
- Try closing any open instances of Visual Studio. Restart the Visual Studio
- Enjoy creating SharePoint Projects.

Hope this helps!

Thanks,

Vinay.


Saturday, October 25, 2014

SharePoint Connection Error

SharePoint Connection Error While Adding Visual Web Part: 

While creating the web part in SharePoint 2013, in the SharePoint customization wizard, i got the following error


While developing web part, Visual Studio creates file structure to debug and deploy the solution. After some searching in google i came to know that, the following are the causes for failure in my case:

- The service account (used for development) did not have login priviliges for SQL Server
- The service account (used for development) did not have dbOwner permissions for specified content DB
- The service account (used for development) did not have read and write access to Config DB.

Once all these conditions are satisfied i can finally connect to SharePoint site via Visual Studio

References: 
http://blog.aditi.com/enterprise_social/challenges-starting-developing-apps-sharepoint-2013/#lightbox[gallery-8VSV]/8/
https://support.microsoft.com/kb/935751?wa=wsignin1.0


Installing Microsoft Office Developer Tools for Visual Studio 2012

While trying to set up My Development machine, i have finished installing Visual Studio 2012. For development in SharePoint 2013 we need to have Microsoft Office Developer Tools installed. Microsoft has web installer version for this which can be downloaded from

http://aka.ms/OfficeDevToolsForVS2012

The download file name is OfficeToolsForVS2012RTW

Unfortunately, due to closed environments, Firewall rules, this installer cannot run. It might give the following error

'Unable to Download the product list from, check your network connection and try again. If the problem persists, report the issue on the Web Platform Installer 5.0 forum at:


At this time while doing some searching in google, i came to know that we can download the following tools one by one and install it offline. Even Web Installer does the same steps but due to connectivity settings it could fail sometimes.

Microsoft Identity Extensions
http://download.microsoft.com/download/0/1/D/01D06854-CA0C-46F1-ADBA-EBF86010DCC6/RTM/MicrosoftIdentityExtensions-64.msi

Workflow Manager Client 1.0
http://download.microsoft.com/download/D/B/D/DBD439A9-370D-40EA-B3B7-45CD935B98FB/WF/en/WorkflowManagerClient_x64.msi

Microsoft Exchange Web Services 2.0
http://download.microsoft.com/download/8/2/5/825231AC-D373-45D4-A644-7AF12340C815/EwsManagedApi32.msi

Microsoft Windows Identity Foundation SDK 4.0
http://download.microsoft.com/download/7/0/1/70118832-3749-4C75-B860-456FC0712870/WindowsIdentityFoundation-SDK-4.0.msi

Microsoft SharePoint Client Components
http://download.microsoft.com/download/E/1/9/E1987F6C-4D0A-4918-AEFE-12105B59FF6A/sharepointclientcomponents_x64.msi

Microsoft Workflow Manager Tools
http://download.microsoft.com/download/D/B/D/DBD439A9-370D-40EA-B3B7-45CD935B98FB/WFTools/en/WorkflowManagerTools_x64.msi

Cumulative Update 1.0 for Microsoft Workflow Manager Tools
http://download.microsoft.com/download/3/B/B/3BBBBE7D-5D9B-4ADD-9A53-BDDF002F4ABB/WorkflowManager-KB2799754-x64-EN.exe

Open XML SDK 2.5
http://download.microsoft.com/download/5/5/3/553C731E-9333-40FB-ADE3-E02DC9643B31/OpenXMLSDKV25.msi

Microsfot Visual Studio Tools for Office Runtime
http://download.microsoft.com/download/A/6/0/A60BE6E6-41E8-4A23-BF86-CD3CC2FE968A/ENU/vstor40_x64.exe

Microsoft Office Developer Tools for Visual Studio 2012 - RTM
http://download.microsoft.com/download/2/F/6/2F6A4FFA-D409-40C8-AF68-F6F0CBE0A00D/ENU/officetools_bundle.exe

Once all these tools are downloaded and installed you can see the office extensions for SharePoint 2013 in Visual Studio 2012 Environment.

The following link helped me:
http://blogs.msdn.com/b/timquin/archive/2013/01/22/setting-up-visual-studio-2012-for-sharepoint-2013-development-offline.aspx

Thank you so much Tim!!!

Happy SharePointing !


Tuesday, May 21, 2013

Extending SharePoint WSS Search


Introduction:

Windows SharePoint Services initially comes with very minimal search capabilities. It do not have advanced search capabilities like MOSS have. The Search Server Express 2008 is an Add on to WSS to avail the advanced search capabilities to WSS such as
-       Search by Metadata
-       Search by File Type
-       Defining Best Bets
-       Creating Search Scopes

Installation:

-          Download Search Server 2008 Express from the Microsoft Office Enterprise Search Web site. For 32 bit go to http://www.microsoft.com/en-us/download/details.aspx?id=17911
-          Navigate to and run the downloaded file, SearchServerExpress.exe, which is a self-extracting file. The file automatically uncompressed and the Search Server Express installation start screen appears.

-          On the Search Server installation Start screen, under Install, click Install Search Server
-          On the Read the Microsoft Software License Terms screen, review the terms, select the I accept terms of agreement check box, and then click continue.
-          Continue the installation by using one of the following procedures to install Search Server over Windows SharePoint Services 3.0 SP1
-          To upgrade an Advanced installation of Windows SharePoint Services SP1
-          On the server type screen, click one of the following:
·         Complete Installs the application server role and the Web front-end (WFE) server role. We recommend choosing this option under either of the following conditions:
a)    This is the first server in your Search Server deployment
b)   You want to configure this computer as an application server for the Search Server 2008 farm that you are creating with this upgrade.
·         Web Front End Installs only the WFE server role.

-          On the Server Type screen:
Optional: in the File Location tab, change the installation path or the location for content index files.  
Optional: In the Feedback tab, specify whether you want to participate in the Customer Experience Improvement Program.
-          On the Server Type screen, change the installation folder if required, and then click Install Now..(For example if the installation folder shows c:\Program files\Microsoft office server then change to d:\Program files\Microsoft office server.  The Installation Progress screen appears. This phase of the installation takes several minutes to complete.


-          On the next screen, which prompts you to complete the configuration:
a)    Ensue that the Run the SharePoint Products and Technologies Configuration Wizard now check box is selected.
b)    Click Close to start the Configuration Wizard.


-          On the Welcome to SharePoint Products and Technologies screen, click Next

-          In the dialog box that notifies you that some services might be restarted or reset during configuration, click Yes.
-          On the Completing the SharePoint Products and Technologies Configuration Wizard screen, click Next.
-          On the Configuration Successful screen, click finish.


-          If this is first server in your Windows SharePoint Services farm that you are upgrading to Search Server, a Web browser opens the Search Server Configuration page. You complete this page only once for any Search Server farm.

To complete Search Server Configuration page required settings
1) In the Default Account For Services section, type the user name and password for the default services account.
2) In the Search Center Account section, type the user name and password for the account for the application pool identity of the default Search Center site.
3) In the Search Contact E-mail section, type the e-mail address of a person in your organization.
4) If you do not need to configure any of the settings in the Optional section of the Search
Refer to the below screen captures for reference


Server Configuration page:
a) Click OK.
b) The Operation in Progress page displays the progress of starting services, creating
    shared services provider, and creating the Web applications and sites for Central
   administration, Search Administration, and the default Search Center site.
c)    This configuration takes several minutes. Your Advanced installation and configuration is now complete.


d)    On the Search Server Configuration is Complete screen, click OK. A Web browser opens the Welcome to Microsoft Search Server 2008 page, which provides guidance for configuring your Search Server installation.

On the Welcome to Microsoft Search Server 2008 page, follow the instructions to do the following:

i. Open the Search Administration Web site to configure and monitor Search Server.

ii. Begin crawling content to build a content index.

iii. Open the Search Center site to try a search.


 Post Installation Steps:

-          Create a root site for the newly created web application for search center. It should be of type “Search Center”.
-          After this installation is complete in the web.config files check for the “Report Viewer Web part” entries at the Safe Control List and try commenting those. Since this report Viewer web part is not a part of the installer but logging those entries which is not required at all. In fact, these entries cause the error while opening the Central Administration page.
-          Check the feature for the web applications and there, the Office Server Enterprise Search and Office Server Site Search must be activated.

Check:

-          Open the Central Administration page from the server and on the quick launch there is a SSP created only for the search service. Once clicked on the SSP link it opens the Search Administration Page.
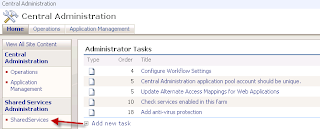


-          Try opening simple site and try for simple search. The results should be successful.
-          The above steps confirm that the Installation of Search Server Express is successful.